Settings

|
The Settings page contains the Global Options sub-page in which key properties that guide administration are set as well as User Preferences, Access, Match Sets, and Uninstall sub-pages. |
Global Options
Global Options contains key properties that guide Transaction Matching administration and are used for the initial setup and configuration of Transaction Matching.Global Options is the default sub-page for Administrators. User Preferences is the default sub-page for Non-Administrators.
NOTE: All global option settings are retained during solution upgrades.
All options display horizontally on the Settings page with the selected sub-page underlined.
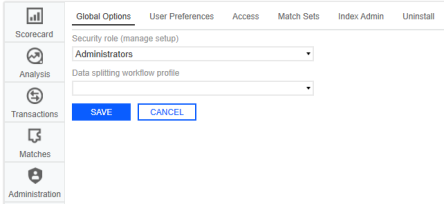
Security Role
Security is governed at the global level. The user group assigned to the Security Role determines who will be the Transaction Matching Administrators. Users in this group have access to all areas of Transaction Matching..
See Options.
IMPORTANT: If Data Security is enabled, Transaction Matching Administrators will only be able to see transactions for which they have access, based on the Data Set Security.
Assign User Group to Security Role
Click Global Options, select the user group from the drop-down list (the default value is Administrators), and click Save.
Data Splitting Workflow Profile
The Data Splitting Workflow Profile is the Base Input Parent created if data splitting is needed.
See Data Splitting Setup for complete setup details.
Assign Data Splitting Workflow Profile
Click Global Options, select the workflow profile from the drop-down list, and click Save.
User Preferences
All users can set preferences for the Start page and the layout of the data sets on the Transactions page.
-
On the Settings page, click User Preferences.
-
In the drop-down menus, select the options.
-
Start Page: The default option is Transactions . You can change it to Scorecard, Analysis or Matches .
-
Transactions Page Layout: The default option is Horizontal. You can change it to Vertical.
-
Defer Refresh Transaction Page: The default option is Yes. You can change it to No.
-
-
Click Save.
-
Click OK.
NOTE: Clicking Cancel will revert unsaved changes to the previously saved selections.
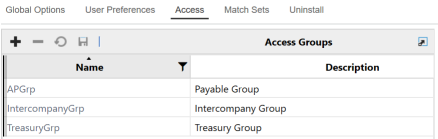
Access
An Access Group is a list of users and their respective roles that are created by OneStream Administrators or Transaction Matching Administrators.
Access Groups can be set up to support the concept of backup resources for a role when the designated user cannot perform the duties. It can contain many users for each Role. For instance, an Access Group may contain more than one User for the Role of Preparer. By adding more than one User per Role in this way, the main person’s backup is already granted access.
Another way that backups are built in is by allowing a person in a superior role to act in place of a person in a lessor role for a given period. For instance, if a user in a Preparer Role is on vacation, an Approver can act as a Preparer, but someone else must approve the match due to Segregation of Duties.
NOTE: Access Groups are used only by the Transaction Matching solution and are different than User Groups used in other parts of OneStream.
|
Role |
Duties |
|---|---|
| Viewer |
Read-only access to:
|
|
Commenter |
Same as Viewer and:
|
|
Preparer |
Same as Commenter and:
|
|
Approver |
Same as Preparer and:
|
|
Local Admin |
Same as Approver and:
|
Add Access Group
-
On the Settings page, click Access.
-
In the Access Groups pane, click Insert Row and then click in the fields to add a Name and Description for the group. It is recommended to use a common naming convention since there could be many of these. Whatever standard is set by your project team, it is recommended to document the naming conventions so that it can be followed by all administrators.
-
Click Save.
Add Members to Access Group
-
On the Settings page, click Access.
-
Click the name of the Access Group you want to modify. The name must be unique and is limited to 200 characters. Once selected, the Members pane will display.
-
In the Members pane, click Insert Row.
-
Click the User cell and select a name from the drop-down list. You can only add a user to an Access Group once for each Role.
-
When a new row is inserted, the Role defaults to Preparer. Change this setting by clicking the Role cell and select the new role from the drop-down list.
-
Click Save.

Match Sets
The Match Sets list displays all match sets and their respective Access Group, identified by a Workflow Profile and Scenario.

Create Match Set
-
On the Settings page, click Match Sets.
-
Click Insert Row.
-
Double-click the Workflow Profile cell and select a Workflow Profile.
-
Double-click the Scenario cell and select a Scenario.
-
Double-click the Type cell and select the number of data sets for this Match Set.
-
Double-click the Access Group cell and select an Access Group to assign to the Match Set.
-
Double-click the Archive Retention Days cell and enter the number of Archive Retention Days, -1 or greater. Default is -1, meaning no archiving is happening.
-
Double-click the Purge Retention Days cell and enter the number of Purge Retention Days, -1 or greater. Default is -1, meaning no purging is happening.
-
Do not make any changes to the Match Set ID. Any text entered is reverted to a system generated GUID.
-
Click Save.
NOTE: Match Sets must contain unique Workflow Profiles and Scenarios.
Copy Match Set to New or Same Scenario
-
On the Settings page, click Match Sets.
-
Select the Match Set you want to copy.
-
Click Copy.
-
In the Copy Match Set dialog box, select the scenario you want to use from the drop-down list and click Copy.
IMPORTANT: When copying a Match Set in the same scenario, it is recommended that all data set fields match.
Delete Match Set
-
On the Settings page, click Match Sets.
-
Select the Match Set you want to delete.
-
Click Delete.
-
Click OK.
IMPORTANT: Only Match Sets without transactions or matches can be deleted.
Archive Retention Days
This indicates that any matched transaction dated earlier than the Archive Retention (Days), calculated from today’s date, will be archived. For example, if Days is set to 180 and today is September 1, 2025 then, transactions with matched dates earlier than 3/5/2025 (180 days earlier) are archived.
IMPORTANT: This can only be updated in the Match Sets page but is also displayed in the Data Retention page.
Purge Retention Days
This indicates that any matched transaction dated earlier than the Purge Retention (Days), calculated from today’s date, will be purged. For example, if Days is set to 180 and today is September 1, 2025 then, transactions with matched dates earlier than 3/5/2025 (180 days earlier) are purged.
IMPORTANT: This can only be updated in the Match Sets page but is also displayed in the Data Retention page.
Index Admin
The Index Admin page is accessible to Administrators and displays helpful information in tables and indexes.
Indexes in SQL are specialized data structures that improve the speed of data retrieval operations on a database table enabling you to achieve optimal performance when filtering within the Transactions or Matches grid since they reduce the time required to locate data. This is especially beneficial as volume of transactions continue to grow.
NOTE: The recommendations provided for indexing comes from Microsoft SQL industry standards and is not a recommendation of OneStream. This page is intended to easily surface this information so that Administrators can update indexes, and do not have to reach out to Support or wait for specific maintenance windows to make index changes.

-
Tables:
-
All tables under the TXM schema are listed here. This includes the transactions table, transactions attributes table, and individual transaction attributes tables.
-
This section also includes Row Count, Compression Type, and Storage Usage (GB).
-
No actions allowed within the table section, this is purely informational.
-
-
Indexes:
-
Provides insight into the indexes for a specific table. This includes Name, Primary Key, Unique, Fill Factor, Fragmentation, and more.
-
Displays usage information on how many times it was used in an Index Scan or Index Seek. This information is read from SQL and resets each time the SQL Service restarts.
-
Displays a recommendation on whether the index should be reorganized or rebuilt based on fragmentation (based on SQL recommendations). When an index is created that is not useful, the Query Optimizer will ignore it.
-
Actions are located above the Indexes section:
-
Create: Administrators can create their own index from scratch.
-
Delete: Administrators can delete the selected index.
-
Rebuild: Will drop and recreate the index. This removes fragmentation and updates the structure completely and is suggested when fragmentation is greater than 30%.
-
Rebuild All: Will rebuild all the indexes in the associated table.
-
Reorganize: Is a lightweight operation that defragments the index without dropping and recreating. Reorganizing is suggested when fragmentation is between 5-30%.
-
Reorganize All: Will reorganize all the indexes in the associated table.
-
Query Usage
-
-
-
Columns:
-
Displays the columns that make up an index as well as the included data columns.
-
Ordinal : Shows which fields are being indexed. A “0” indicates the field is not being indexed on. An integer will indicate that the field is being indexed on.
-
Included: Indicates fields that are included for easy reference, but NOT indexed on.
-
-
-
Statistics:
-
These statistics are created by SQL and used by the Query Optimizer to help determine the recommendations.
-
This includes information like Rows, Rows Sampled, Modified Counter, and Unfiltered Rows.
-
Actions are located above the Statistics section:
-
Update: Updates just the selected statistic.
-
Update All: Updates all statistics for the selected table.
-
-
Uninstall
The Uninstall feature allows you to uninstall the user interface or the entire solution. If performed as part of an upgrade, any modifications that were made to standard solution objects are removed.
IMPORTANT:
The uninstall options are:
-
Uninstall UI - OneStream Financial Close removes all solutions integrated into OneStream Financial Close, including related dashboards and business rules but leaves the databases and related tables.
IMPORTANT: This procedure resets the Workspace Dashboard Name to (Unassigned). An Administrator must manually reassign the Workspace Dashboard Name after performing an Uninstall UI.
-
Uninstall Full - OneStream Financial Close removes all the related data tables, data, dashboards, and business rules from all solutions integrated into OneStream Financial Close. Select this option to completely remove the solutions or to perform an upgrade that is so significant in its changes to the data tables that this method is required.
CAUTION: Uninstall procedures are irreversible.
Load Transaction Data
After Transaction Matching is set up, one of the first steps is to create the data set. In order to do this, the data source must be identified.
Data loading leverages the OneStream Data Integration Functionality (Flat File or Direct Connect) into Stage. During import, the data transfers into Stage and then to the linked Match Set Data Set; assigning it a transaction number.
You can leverage a single file with all transactions and then split the data in Transaction Matching to the applicable Match Set Data Sets. Organizations can also import multiple data source formats (i.e. disparate GLs) and stack the transactions in a single Data Set creating a single source. Data can be imported Daily, Weekly, Monthly, etc.
Once the base input import is set up, data can be loaded to it before it is assigned to a transaction matching data set. This occurs only in stage and will not be copied into Transaction Matching until it is linked to a data set. In order to reduce the volume of data maintained in OneStream, once data is loaded into the Transaction Matching tables it is cleared from Stage.
If the date field in your data source is active but contains a null or blank value, or if certain date formats are incompatible with InvariantCulture during the transaction import, the import process will fail. You will receive an error message specifying the unsupported column and value.
However, you can use a Complex Expression to correctly convert date formats or set a default date for blank values.
This example is provided in case the source data cannot be altered. This will convert the date into syntax suitable for the transaction matching conversion:
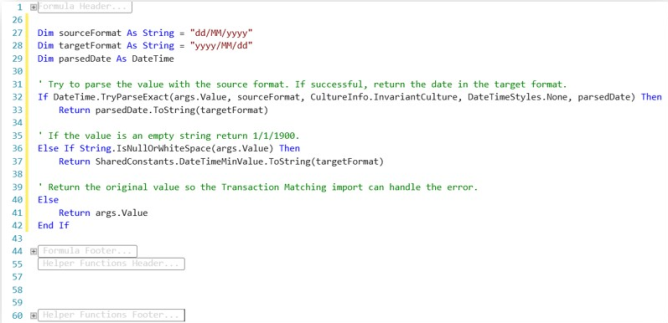
TIP: The first row of data imported will remain in Stage in order to identify the sources imported into Transaction Matching.
See Integration in the Design and Reference Guide.


